The Passive Solar Design was a building project based off tiny homes. Our goal was to build a tiny house that was energy efficient based off some experiments we did beforehand to gain knowledge on energy. In the beginning of the two month period, we had to do our project, we started off by learning about designing a Hot Water Heater, a Daylighting Design Activity, Materials Heat Testing Lab, and finally the designing of our tiny home. During the building part of our project, we also learned about wind turbines. In the end, because we decided we wanted to make a mobile tiny home, we had to think about how we could use energy even more efficiently, but things like solar angles did not matter as much for us, as we could just move our home based off the light.
Hot Water Heater
To learn about the how heat transfers, we designed a hot water heater. This hot water heater was based off solar energy and how to transfer the sun's energy to the water. The 4 types of heat transfer are conduction, convection, radiation, and insulation. For our hot water, we decided to make reflective flaps surrounding the water, with copper tubing in it, so that we could adjust the flaps depending on where the sun was in the sky. This made for a simple design and theoretically, would have heated the water. We had copper tubing in the water because it is a good heat conductor and would heat a small amount of water, pretty fast. In the end, we learned how we could use the sun's heat to warm our tiny home and keep us from freezing.
To learn about the how heat transfers, we designed a hot water heater. This hot water heater was based off solar energy and how to transfer the sun's energy to the water. The 4 types of heat transfer are conduction, convection, radiation, and insulation. For our hot water, we decided to make reflective flaps surrounding the water, with copper tubing in it, so that we could adjust the flaps depending on where the sun was in the sky. This made for a simple design and theoretically, would have heated the water. We had copper tubing in the water because it is a good heat conductor and would heat a small amount of water, pretty fast. In the end, we learned how we could use the sun's heat to warm our tiny home and keep us from freezing.
Daylighting Design Activity
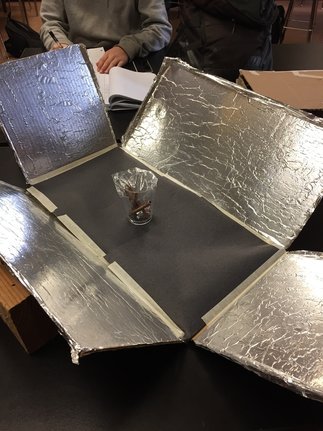
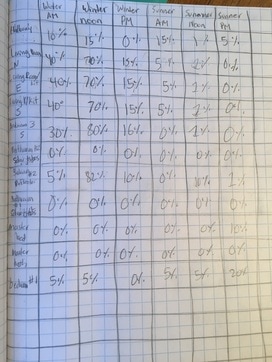
For this portion of our project, our goal was to build a home based off where the sun's light hit. By doing this, we could figure out where we needed windows in our tiny home to gain the most light. We learned about the types of windows and where the sun was throughout the day. We also learned that having light colored walls will reflect the sun's light throughout the room while darker colors will absorb all the light. In the end, our group did not need to worry too much about window placement because we could adjust the house to the sun's current position. We did take in to account that the more windows, the better, and white walls will do wonders.On the right, we have our data for each room based off where the sun was. We used a light bulb to model the sun and took data based on the sun's and the house's position.
For this portion of our project, our goal was to build a home based off where the sun's light hit. By doing this, we could figure out where we needed windows in our tiny home to gain the most light. We learned about the types of windows and where the sun was throughout the day. We also learned that having light colored walls will reflect the sun's light throughout the room while darker colors will absorb all the light. In the end, our group did not need to worry too much about window placement because we could adjust the house to the sun's current position. We did take in to account that the more windows, the better, and white walls will do wonders.On the right, we have our data for each room based off where the sun was. We used a light bulb to model the sun and took data based on the sun's and the house's position.
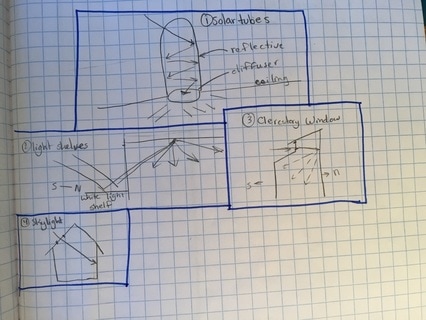
To the left we have different types of windows that are efficient in providing light for houses that don't get sun from big side windows. These windows include; solar tubes, light sleeves, clerestory windows, and skylights.
|
|
|
Materials Heat Testing Lab
For this lab, we tested how different materials would react to the sun, and how that would change how they heat and cool. Our group tested different types of wood for flooring. We put the different types of wood under a 120 k-watt heat lamp for 10 minutes with the light on and 10 with it off. The light was 1 ft away from the wood. Th reason for testing heat on materials was to seen which material had the highest specific heat capacity and the lowest. If an object heated really fast, it had a low specific heat capacity, while if it took a long time to heat, it had a high specific heat capacity. The higher the specific heat capacity, the better. This is because if something heats really fast, it is also going to cool really fast. This isn't good for flooring because then the temperature is constantly changing, and it doesn't stay warm as long. We want the heat the take a long time to heat, so it can hold heat for the longest amount of time possible. This isn't the case for all parts of a house, but it is for flooring. For example, for a roof, we want a low specific heat capacity, meaning it will reflect the heat away.
For this lab, we tested how different materials would react to the sun, and how that would change how they heat and cool. Our group tested different types of wood for flooring. We put the different types of wood under a 120 k-watt heat lamp for 10 minutes with the light on and 10 with it off. The light was 1 ft away from the wood. Th reason for testing heat on materials was to seen which material had the highest specific heat capacity and the lowest. If an object heated really fast, it had a low specific heat capacity, while if it took a long time to heat, it had a high specific heat capacity. The higher the specific heat capacity, the better. This is because if something heats really fast, it is also going to cool really fast. This isn't good for flooring because then the temperature is constantly changing, and it doesn't stay warm as long. We want the heat the take a long time to heat, so it can hold heat for the longest amount of time possible. This isn't the case for all parts of a house, but it is for flooring. For example, for a roof, we want a low specific heat capacity, meaning it will reflect the heat away.
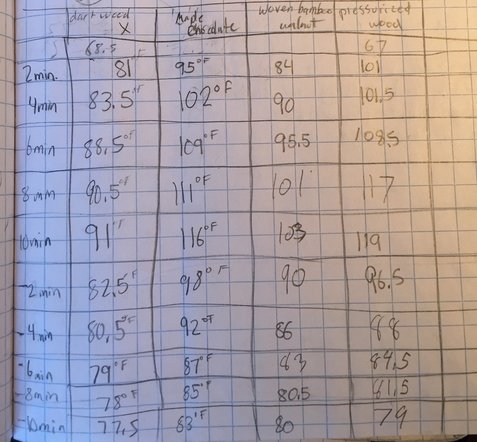
To the left we have the data we collected for each type of wood.
Building Design
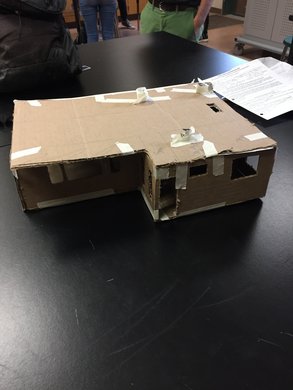
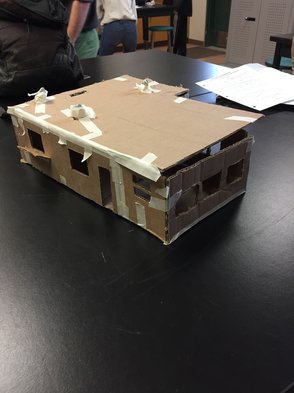
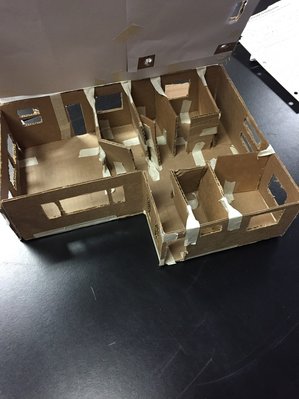
In the slideshow below, you can see our design technique, our thinking process, and all of our initial work for the actual tiny home. Our blueprints are slides 6 to 11 and our 3-D model are slides 12-14. We also have key features, trailer decisions, and our total cost. The materials list of everything we need to buy is below to slideshow.
In the slideshow below, you can see our design technique, our thinking process, and all of our initial work for the actual tiny home. Our blueprints are slides 6 to 11 and our 3-D model are slides 12-14. We also have key features, trailer decisions, and our total cost. The materials list of everything we need to buy is below to slideshow.
Wind Turbine Lab
To create electricity for our house, we needed an efficient way to do so. A wind turbine would do this easily and it would work especially well with a mobile home. During the end of our project, we spent a few days creating a wind turbine. We decided on a design, then tested it in different levels of wind. Our group tested two types of turbines and we found that slightly curved pieces caught the wind better.
To create electricity for our house, we needed an efficient way to do so. A wind turbine would do this easily and it would work especially well with a mobile home. During the end of our project, we spent a few days creating a wind turbine. We decided on a design, then tested it in different levels of wind. Our group tested two types of turbines and we found that slightly curved pieces caught the wind better.
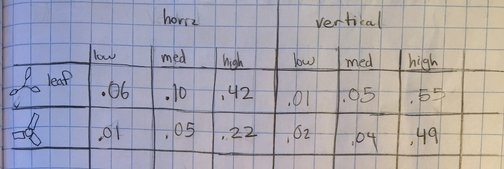
To the left, you can see our data and what designs we chose. We found that have the turbine stand vertically created more energy than vertically. Our reason for creating a wind turbine is we needed a way to gain electricity, not hooked to power lines. Wind turbines are cheap and easy to make, making them pop out to us. Although my group decided on solar panels, we highly considered also putting a wind turbine on our solar home, and it is an addition we can always make.
| energyjustification342017.pdf |
Solar Angles
Key Definitions
radiation- heat transfer using rays/waves (no medium required)
conduction-heat transfer through a material (solid)
convection-heat transfer through fluid (liquid/gas)
insulation-material that stops the passage of heat, electricity, or sound
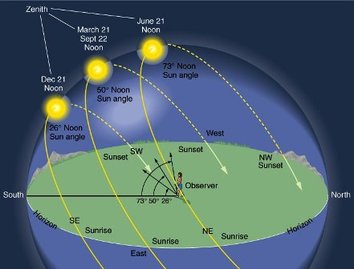
Solar angles- some key facts about solar angles are; the equator is hot year round, poles are cold year round, and the seasons take place between the poles and equator. To the right is a model of how the solar angles differ depending on the time of year and day.
Day lighting Techniques-to see diagrams of possible windows for day light, scroll up to the Day lighting Design Activity.
radiation- heat transfer using rays/waves (no medium required)
conduction-heat transfer through a material (solid)
convection-heat transfer through fluid (liquid/gas)
insulation-material that stops the passage of heat, electricity, or sound
Solar angles- some key facts about solar angles are; the equator is hot year round, poles are cold year round, and the seasons take place between the poles and equator. To the right is a model of how the solar angles differ depending on the time of year and day.
Day lighting Techniques-to see diagrams of possible windows for day light, scroll up to the Day lighting Design Activity.
Reflection
Over the course of this two month project, I learned a lot of valuable information. I feel I did really well in the areas of teamwork, work quality, and my thinking process as did my team. I do feel that my time management could be improved as I worked on the project at home a bit when I could have finished it in class, working at a faster speed. Individually, I feel I really improved in compassion for my other teammates. I encouraged everyone to work and we all worked very hard. i do think I could improve my listening skills. I really enjoyed some parts of this project, but others not so much. While it was cool to learn about each individual lab, I feel it was not the most fun spending an lot of days working on just blueprints. It was too repetitive and I noticed myself and others loosing their ability to keep working. Overall, this project was fun and very useful.
Over the course of this two month project, I learned a lot of valuable information. I feel I did really well in the areas of teamwork, work quality, and my thinking process as did my team. I do feel that my time management could be improved as I worked on the project at home a bit when I could have finished it in class, working at a faster speed. Individually, I feel I really improved in compassion for my other teammates. I encouraged everyone to work and we all worked very hard. i do think I could improve my listening skills. I really enjoyed some parts of this project, but others not so much. While it was cool to learn about each individual lab, I feel it was not the most fun spending an lot of days working on just blueprints. It was too repetitive and I noticed myself and others loosing their ability to keep working. Overall, this project was fun and very useful.
